
WARNING: technical content ahead! There’s also a tonne of config files, which make this page look longer than it really is, but hopefully they’ll help other people who want to do similar work.
For many years I’ve been using variations of the Linksys WRT54G. I first switched to this router when freeware ROMs became available; I’ve used DD-WRT, Tomato, OpenWRT and others. I love the flexibility it gives me. My current router is a TP-Link TL1043ND with OpenWRT. It works well, and the flexibility means it’s also configured as my OpenVPN endpoint, HEnet IPv6 tunnel endpoint, dual SID WiFi access point
However I have some problems with this setup:
Upgrades are painful. If there’s a bug in some core code (eg openvpn) then the only real fix is to find the latest software and reflash; you can’t just upgrade the individual packages, even if they were installed as extras. This has meant that my router may technically be vulnerable to known issues.
Network speed. This week I upgraded my FIOS connection to gigabit speeds; the TP-Link maxes out around 175Mbit/s and so is now the bottleneck.
It’s not exactly performant; the OpenVPN speed is horribly slow. This isn’t really a problem since I just use it as an admin channel between my home network and my internet hosts, but it’d be nice to resolve.
Since I needed a newer faster router I decided to try and fix these problems at the same time. This, basically, meant building a real PC with a real OS and configuring it as a router. I could have looked at something like pfsense but that’s a different OS to manage. I didn’t particularly need a pretty GUI, either.
So I went with a CentOS 7 build.
The hardware
The nice thing about these WRT routers is they are cheap. Of course there are tradeoffs (performance). I wanted something in the same ballpark and settled on a PC Engines APU2 board. They only had the 2Gb RAM model in stock when I ordered, but that should be sufficient:
System Board: $102.00
        Case: $ 10.00
   16Gb SATA: $ 14.40
   WiFi card: $ 19.00
    Antennas: $  4.20
      Cables: $  3.00
    Shipping: $ 14.30
              =======
              $166.90
That’s in the right ballpark. It’s a fanless system, so quiet, and just runs from a DC power adapter (which I had available). The one downside is that the WiFi card can only work on 2.4 or 5Ghz, not both at the same time, but otherwise this is just about right.
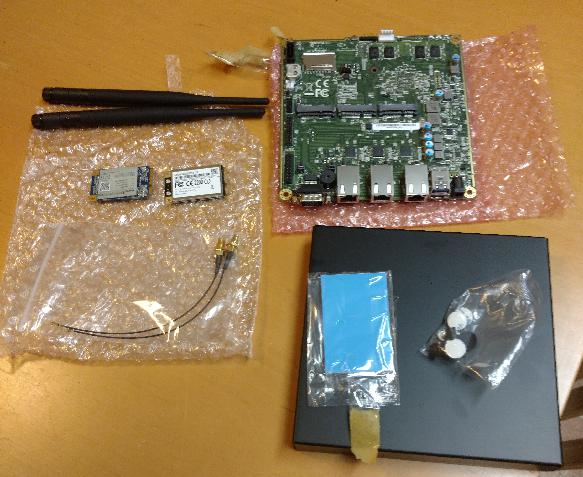
The PC Engines team have a number of support files which allow you to generate boot USB drives to allow you install your OS of choice, including (in my case) CentOS 7. And the machine has a serial console, making it easy to remote manage. You don’t need to plug a keyboard, mouse, monitor in (indeed, there’s no VGA/HDMI output!)
The OS
I installed a pretty minimal CentOS 7 image on the machine. Why C7? Because that’s what the majority of my systems are based on. It meant I could use my standard backup, monitoring, patching, control processes. I removed NetworkManager, firewalld, unnecessary firmware. I added the EPEL repo. In particular I added
hostapdto be the Wifi AP managerbridge-utilsto manage the bridgingiwandwireless-toolsto manage the WiFiopenvpnfor the VPN endpointiptables-serviceto allow me to save/restore IPtable configurationsdhcpanddnsmasqto serve guest-wifi addressesradvdfor IPv6 routing
Basic network layout
I want to have 3 networks:
- WAN
- LAN
- Guest-net
To make rules easier to follow I created 3 bridges (br-wan, br-lan, br-guest). I was then able to associate physical and logical devices to this.
So, for example, in /etc/sysconfig/network-scripts I could configure
the WAN port:
% cat ifcfg-br-wan
DEVICE=br-wan
TYPE=Bridge
ONBOOT=yes
BOOTPROTO=dhcp
DEFROUTE=yes
IPV4_FAILURE_FATAL=no
IPV6INIT=yes
IPV6_AUTOCONF=yes
IPV6_DEFROUTE=yes
IPV6_FAILURE_FATAL=no
IPV6_ADDR_GEN_MODE=stable-privacy
PEERDNS=no

% cat ifcfg-enp2s0
DEVICE=enp2s0
TYPE=Ethernet
ONBOOT=yes
BRIDGE="br-wan"
NM_CONTROLLED="no"
This puts the second ethernet port onto the WAN bridge and configures it for DHCP, which is what my ISP uses. I plug in the cable and…
% ip -4 addr show dev br-wan
13: br-wan: <BROADCAST,MULTICAST,UP,LOWER_UP> mtu 1500 qdisc noqueue state UP qlen 1000
    inet 173.54.110.200/24 brd 173.54.110.255 scope global dynamic br-wan
       valid_lft 4808sec preferred_lft 4808sec
Perfect, the machine is now on the internet… and succeptible to
being attacked. Indeed, I saw one ssh scan happen while I was building
this; I should have locked down traffic before I started, but I felt the
risk was low (only 1 account has password access and that has a hard
password).
The LAN side can be similarly configured, but with a static IP:
$ cat ifcfg-br-lan
DEVICE=br-lan
TYPE=Bridge
ONBOOT=yes
DEFROUTE=yes
IPV4_FAILURE_FATAL=no
IPV6INIT=yes
IPV6_DEFROUTE=yes
IPV6_FAILURE_FATAL=no
IPV6_AUTOCONF=no
IPV6ADDR=2001:470:1f07:dc4::1/64
BOOTPROTO=none
IPADDR=10.0.0.1
NETMASK=255.255.255.0
BROADCAST=10.0.0.255
NETWORK=10.0.0.0

$ cat ifcfg-enp1s0
DEVICE=enp1s0
TYPE=Ethernet
ONBOOT=yes
BRIDGE="br-lan"
NM_CONTROLLED="no"
Note I’ve given this an IPv6 address as well.
And br-guest is similarly static, but (at this point) with no ethernet port assigned:
$ cat ifcfg-br-guest
DEVICE=br-guest
TYPE=Bridge
ONBOOT=yes
BOOTPROTO=static
IPADDR=10.100.100.1
NETMASK=255.255.255.0
DEFROUTE=no
IPV4_FAILURE_FATAL=no
IPV6INIT=no
The observant will have noticed that I haven’t mentioned WiFi - that gets configured next!
WiFi
The hostapd program creates the WiFi networks and controls the
bridges the networks are connected to. The WiFi card in this machine
can host multiple SSIDs at the same time. In my case I defined two
networks (LAN and GUEST) with their own WPA passwords and associated
to the relevant networks.
$ cat /etc/hostapd/hostapd.conf
ctrl_interface=/var/run/hostapd
ctrl_interface_group=wheel

macaddr_acl=0
auth_algs=1
ignore_broadcast_ssid=0

driver=nl80211

interface=wlp4s0
hw_mode=g
channel=1

ssid=LANSSID
ap_isolate=1
disassoc_low_ack=1
preamble=1
wmm_enabled=1
ignore_broadcast_ssid=0
uapsd_advertisement_enabled=1
wpa_passphrase=YOURNETWORKPASSWORD
auth_algs=1
wpa=2
wpa_pairwise=CCMP
bridge=br-lan
wpa_key_mgmt=WPA-PSK
okc=0
disable_pmksa_caching=1
bssid=04:f0:21:26:d3:7e

bss=wlp4s0_1
ssid=GUESTSSID
ap_isolate=1
disassoc_low_ack=1
preamble=1
wmm_enabled=1
ignore_broadcast_ssid=0
uapsd_advertisement_enabled=1
wpa_passphrase=YOURGUESTNETPASSWORD
auth_algs=1
wpa=2
wpa_pairwise=CCMP
bridge=br-guest
wpa_key_mgmt=WPA-PSK
okc=0
disable_pmksa_caching=1
bssid=04:f0:21:26:d3:7f
This configures the wlp4s0 (WiFi card) interface but also creates a
second logical interface wlp4s0_1 for the guest network.
Bridge results
We can verify what interface is on what network quite simply.
% brctl show
bridge name     bridge id               STP enabled     interfaces
br-guest        8000.04f02126d37f       no              wlp4s0_1
br-lan          8000.000db9439ccc       no              enp1s0
                                                        wlp4s0
br-wan          8000.000db9439ccd       no              enp2s0
Guestnet DHCP and DNS
For my LAN I have an ISC DHCP and BIND setup running on another machine; machines on the LAN network (whether cabled or wireless) will talk to them; I don’t need to worry. But guestnet users can’t reach these. So the router needs to provide these functions.
The out-of-box configuration for dnsmasq pretty much works just fine.
The only change I added was no-hosts to prevent it looking up entries
in the /etc/hosts file. At the moment I’m letting it use the
DNS server list in /etc/resolv.conf as the server to forward to
(ie my internal host) but I might reconfigure it to point to Google
instead.
If I do that then I expect (untested!) the configuration to be
no-resolv
server=8.8.8.8
This would allow me to use this router’s DNSmasq as a secondary DNS for LAN usage. (Food for thought).
For DHCP I’m sticking with ISC dhcpd, with a simple configuration:
ddns-update-style  none;

option option-128 code 128 = string;
option option-129 code 129 = text;
option option-221 code 221 = text;

subnet 10.100.100.0 netmask 255.255.255.0 {
  authoritative;
  option routers      10.100.100.1;
  option subnet-mask    255.255.255.0;
  option domain-name    "spuddy.org";
  option domain-name-servers  10.100.100.1;
  default-lease-time 3600;
  max-lease-time 3600;
  range dynamic-bootp 10.100.100.10 10.100.100.200;
}
Basically, serve out addresses with a default route and DNS server. Pretty simple!
IPv6
Setting up an IPv6 tunnel
If have a HEnet tunnel for my home IP range. This is pretty easy to set up with CentOS:
DEVICE=sit1
BOOTPROTO=none
ONBOOT=yes
IPV6INIT=yes
IPV6TUNNELIPV4=IP_ADDRESS_OF_REMOTE_SERVER
IPV6ADDR=YOUR_ASSIGNED_IPv6 ENDPOINT
And that’s pretty much it. As long as your IPv4 address is assigned at HE.net then the tunnel comes up and runs.
You can do this with a dynamic script that probes your external IP address and then calls the tunnelbroker API:
PASS=YOUR_PASSWORD
USERID=YOUR_USERNAME
GTUNID=YOUR_TUNNEL_ID
HOST=https://$USERID:$PASS@ipv4.tunnelbroker.net

newip=$1

# Check to see what the end point currently is
x=$(wget -q --no-check-certificate -O - $HOST/tunnelInfo.php?tid=$GTUNID | sed -n 's/^.*<clientv4>\(.*\)<.*$/\1/p')

if [ "x$x" == "x$newip" ]
then
  echo Tunnel IP is already correct
  exit
fi

wget -q --no-check-certificate -O - "$HOST/nic/update?hostname=$GTUNID&myip=$newip"
With a script similar to this even if your IP address changes then you can make sure the tunnel endpoint is updated and your IPv6 connection will restore.
(Hmm, I run that script from a host on my LAN; I wonder if I could make it a triggered event; see the “reflection” section below on this)
Setting up radvd
In order for the rest of your network to see the IPv6 world we use radvd.
This allows hosts to auto-discover their IPv6 network and default route.
We just configure it on the LAN network:
$ cat /etc/radvd.conf
interface br-lan
{
        AdvSendAdvert on;
        MinRtrAdvInterval 30;
        MaxRtrAdvInterval 100;
        prefix YOUR_IP_V6_NETWORK/64
        {
                AdvOnLink on;
                AdvAutonomous on;
                AdvRouterAddr off;
        };
};
In my case the IPv6 network is that from HE.net; 2001:470:1f07:dc4::/64
as matches the IPv6 address defined in ifcfg-br-lan
Firewalls and routing
Now we have the plumbing out of the way we can start to make the device act like a router.
Let’s make the kernel forward traffic first:
$ cat /etc/sysctl.d/forward.conf
net.ipv4.ip_forward = 1
net.ipv4.conf.all.forwarding = 1
net.ipv6.conf.all.forwarding = 1
At this point your LAN and guest networks can see each other, and you should be able to see your external (ISP provided) IP address. But not much else on IPv4. You should have full internet access via IPv6… and the rest of the internet can see you, as well!
iptables is used to configure both NAT and firewall rules; ip6tables
is used to configure IPv6 firewall rules. We don’t need NAT on a
routed IPv6 network.
There’s two ways of doing this; you can run the iptables command to add
rules, or you can edit /etc/sysconfig/iptables files directly. If
you use the commands then run service iptables save to update the
config file so the rules persist after a reboot. If you edit the file
directory then run service iptables reload to force them to be reloaded.
I tend to do edit the file directly!
IPv4 rules
when looking at standard rules (INPUT/OUTPUT/FORWARD) we have to look at them from the perspective of the router. INPUT rules are those that impact packets that are targetted at the router; OUTPUT rules are those that originate from the router; FORWARD rules are those that pass through the router. This gets important for NAT where the packet targets the router’s external IP address.
First we need to allow incoming traffic that corresponds to outgoing connections (if you reach out on port 80 then you want to allow the remote end to reply!). We’ll add two basic rules to the 3 main filter channels. From the command line this would look like:
iptables -A INPUT -m conntrack --ctstate RELATED,ESTABLISHED -j ACCEPT
iptables -A INPUT -m conntrack --ctstate INVALID -j DROP
iptables -A OUTPUT -m conntrack --ctstate RELATED,ESTABLISHED -j ACCEPT
iptables -A OUTPUT -m conntrack --ctstate INVALID -j DROP
iptables -A FORWARD -m conntrack --ctstate RELATED,ESTABLISHED -j ACCEPT
iptables -A FORWARD -m conntrack --ctstate INVALID -j DROP
You’ll see similar entries in the *filter section of the config
file.
Now we want to allow some specifics. The LAN needs to see the WAN, for example. We can add some more INPUT rules:
-A INPUT -i lo -j ACCEPT
-A INPUT -i br-lan -j ACCEPT
-A INPUT -p icmp -j ACCEPT
-A INPUT -p tcp -m tcp --dport 12345 -j ACCEPT
-A INPUT -i br-guest -j guest_reflection
-A INPUT -j REJECT --reject-with icmp-port-unreachable
You can see, now, why I created these bridge devices. It becomes pretty clear what networks rules apply to! We’ll talk about the “reflection” rule later.
The --dport 12345 is where I run my OpenVPN server. This allows
the remote machines to access it.
Forwarding is similar:
-A FORWARD -i br-lan -j ACCEPT
-A FORWARD -i tun0 -j ACCEPT
-A FORWARD -i br-wan -m conntrack --ctstate DNAT -j ACCEPT
-A FORWARD -i br-guest -o br-wan -j ACCEPT
-A FORWARD -i br-guest -j guest_reflection
-A FORWARD -j REJECT --reject-with icmp-port-unreachable
The br-wan rule is important when we get to port forwarding. We
also only allow the guest network to see the WAN; it can no longer
reach your LAN machines.
The output chain doesn’t have any special requirements; we allow any packet originating from the router to be sent out.
So far so good. But you still can’t see the outside world from the
LAN. So now we get to the NAT table. This is configured with
iptables -t nat, or by entries in the *nat section of the config
file.
With NAT we have INPUT, OUTPUT, PREROUTING and POSTROUTING sections.
The first step is (remember, if from the command line to add -t nat)
-A POSTROUTING -o br-wan -j MASQUERADE
This is the magic that allows outgoing communication. Every machine on your LAN and guest networks should now be able to see servers on the internet.
Many people (me included!) also want to allow some services internally to be visible externally. For example, I run my own IMAPS server which I have my phone configured to talk to. We need to allow this traffic through:
-A PREROUTING -i br-wan -p tcp -m tcp --dport 12346 -j DNAT --to-destination 10.0.0.137:993
This tells the router that anything arriving from the WAN targeting port 12346 should be redirected to the internal server 10.0.0.137 on the IMAPS port.
You can define a series of ports; eg for bittorrent I have
-A PREROUTING -i br-wan -p tcp -m tcp --dport 6881:6999 -j DNAT --to-destination 10.0.0.137:6881-6999
These work in conjunction with the earlier FOWARDING DNAT rule I mentioned to let the traffic through.
IPv6 rules
Because there’s no NAT needed here we can have simpler rules. I just allow
my external servers to access the internal machines, and nothing else.
That makes for a very trivial set of rules in /etc/sysconfig/ip6tables
*filter
:INPUT ACCEPT [0:0]
:FORWARD ACCEPT [0:0]
:OUTPUT ACCEPT [0:0]
-A INPUT -m conntrack --ctstate RELATED,ESTABLISHED -j ACCEPT
-A INPUT -m conntrack --ctstate INVALID -j DROP
-A INPUT -i lo -j ACCEPT
-A INPUT -i br-lan -j ACCEPT
-A INPUT -p ipv6-icmp -j ACCEPT
-A INPUT -s ip:6:of::HOST1/128 -j ACCEPT
-A INPUT -s ip:6:of::HOST2/128 -j ACCEPT
-A INPUT -s ip:6:of::HOST3/128 -j ACCEPT
-A INPUT -j REJECT --reject-with icmp6-adm-prohibited
-A FORWARD -m conntrack --ctstate RELATED,ESTABLISHED -j ACCEPT
-A FORWARD -m conntrack --ctstate INVALID -j DROP
-A FORWARD -i br-lan -j ACCEPT
-A FORWARD -s ip:6:of::HOST1/128 -j ACCEPT
-A FORWARD -s ip:6:of::HOST2/128 -j ACCEPT
-A FORWARD -s ip:6:of::HOST3/128 -j ACCEPT
-A FORWARD -j REJECT --reject-with icmp6-adm-prohibited
-A OUTPUT -m conntrack --ctstate RELATED,ESTABLISHED -j ACCEPT
-A OUTPUT -m conntrack --ctstate INVALID -j DROP
As with IPv4, the INPUT rules allow those hosts to access the router directly, the FORWARD rules allow it to access machines behind the router on my LAN.
Reflection
So far we now have a working router. We can reach the internet and allow the internet to reach into our network. But there’s one tiny gotcha. Which is an odd edge-case that you may not care about…
Access from your internal network (LAN, guestnet) to your external IP address will not work! That’s because the traffic to those external ports doesn’t come in from br-wan and so isn’t rewritten. Now OpenWRT creates a series of additional rules called “reflection” rules. They take the packet and rewrite it so it looks like it comes from the router, and then sends it back in to the LAN. It’s a kludge, but it works.
In the NAT section I added two rules:
-A PREROUTING -s 10.0.0.0/8 -p tcp -m tcp -j reflection_pre
-A POSTROUTING -s 10.0.0.0/8 -p tcp -m tcp -j reflection_post
Now this allows us to reflect traffic originating from any internal IP address (LAN, guestnet) by creating rules in the new chains.
The problem is that these rules need to refer to the router’s external IP address, and this can change. So I added a hook into dhclient’s configuration, which gets run whenever an IP address is associated:
$ cat /etc/dhcp/dhclient.d/reflect.sh
#!/bin/bash

I="/sbin/iptables"
N="$I -t nat"

get_ip()
{
  /sbin/ip -4 addr show dev $1 | sed -n 's/^\s*inet \(.*\)\/.*/\1/p'
}

LAN_ADDR=$(get_ip br-lan)
LAN=${LAN_ADDR%.*}.0/24
GUEST_ADDR=$(get_ip br-guest)
GUEST=${GUEST_ADDR%.*}.0/24
ALL_LAN=${LAN_ADDR%.*}.0/8

reflect()
{
  $I -A guest_reflection -s $ALL_LAN -d $1/32 -p tcp -m tcp --dport $(echo $2 | tr - :) -j ACCEPT

  $N -A reflection_post -s $ALL_LAN -d $1/32 -p tcp -m tcp --dport $(echo $2 | tr - :) -j SNAT --to-source $LAN_ADDR
  $N -A reflection_pre -s $ALL_LAN -d $new_ip_address/32 -p tcp -m tcp --dport $(echo $3 | tr - :) -j DNAT --to-destination $ip:$i_port
}

reflect_restore()
{
  if [ "$interface" = "br-wan" -a -z "$new_ip_address" ]
  then
    $N -N reflection_post 2> /dev/null
    $N -N reflection_pre  2> /dev/null
    $N -F reflection_post
    $N -F reflection_pre
    $I -N guest_reflection 2> /dev/null
    $I -F guest_reflection
  fi
}

reflect_config()
{
  if [ "$interface" = "br-wan" -a -n "$new_ip_address" -a "$new_ip_address" != "$old_ip_address" ]
  then
    $N -N reflection_post 2> /dev/null
    $N -N reflection_pre  2> /dev/null
    $N -F reflection_post
    $N -F reflection_pre
    $I -N guest_reflection 2> /dev/null
    $I -F guest_reflection

    $I -L -t nat -n | sed -n 's/^DNAT.*tcp dpts*:\(.*\) to:\(.*\):\(.*\)/\1 \2 \3/p' | while read e_port ip i_port
    do
      reflect $ip $i_port $e_port
    done
  fi
  $N -A reflection_post  -j RETURN
  $N -A reflection_pre   -j RETURN
  $I -A guest_reflection -j RETURN
}
Now what this does is look at the existing port forwarding rules you’ve defined and then builds the necessary forwarding and NATting rules. So, for example, for the IMAPS port I can now see:
# iptables -n -L guest_reflection -v | grep 993
    0     0 ACCEPT     tcp  --  *      *       10.0.0.0/8           10.0.0.137           tcp dpt:993

# iptables -t nat -n -L reflection_pre -v | grep 993
    0     0 DNAT       tcp  --  *      *       10.0.0.0/8           173.54.110.200       tcp dpt:12346 to:10.0.0.137:993

# iptables -t nat -n -L reflection_post -v | grep 993
    0     0 SNAT       tcp  --  *      *       10.0.0.0/8           10.0.0.137           tcp dpt:993 to:10.0.0.1
Final configuration:
# cat /etc/sysconfig/iptables
*filter
:INPUT ACCEPT [0:0]
:FORWARD ACCEPT [0:0]
:OUTPUT ACCEPT [0:0]
:guest_reflection - [0:0]
-A INPUT -m conntrack --ctstate RELATED,ESTABLISHED -j ACCEPT
-A INPUT -m conntrack --ctstate INVALID -j DROP
-A INPUT -i lo -j ACCEPT
-A INPUT -i br-lan -j ACCEPT
-A INPUT -p icmp -j ACCEPT
-A INPUT -p tcp -m tcp --dport 12345 -j ACCEPT
-A INPUT -i br-guest -j guest_reflection
-A INPUT -j REJECT --reject-with icmp-port-unreachable
-A FORWARD -m conntrack --ctstate RELATED,ESTABLISHED -j ACCEPT
-A FORWARD -m conntrack --ctstate INVALID -j DROP
-A FORWARD -i br-lan -j ACCEPT
-A FORWARD -i tun0 -j ACCEPT
-A FORWARD -i br-wan -m conntrack --ctstate DNAT -j ACCEPT
-A FORWARD -i br-guest -o br-wan -j ACCEPT
-A FORWARD -i br-guest -j guest_reflection
-A FORWARD -j REJECT --reject-with icmp-port-unreachable
-A OUTPUT -m conntrack --ctstate RELATED,ESTABLISHED -j ACCEPT
-A OUTPUT -m conntrack --ctstate INVALID -j DROP
COMMIT
*nat
:PREROUTING ACCEPT [4:2876]
:INPUT ACCEPT [1:60]
:OUTPUT ACCEPT [0:0]
:POSTROUTING ACCEPT [0:0]
:reflection_post - [0:0]
:reflection_pre - [0:0]
-A PREROUTING -i br-wan -p tcp -m tcp --dport 80 -j DNAT --to-destination 10.0.0.2:80
-A PREROUTING -i br-wan -p tcp -m tcp --dport 443 -j DNAT --to-destination 10.0.0.2:443
-A PREROUTING -i br-wan -p tcp -m tcp --dport 12346 -j DNAT --to-destination 10.0.0.137:993
-A PREROUTING -i br-wan -p tcp -m tcp --dport 6881:6999 -j DNAT --to-destination 10.0.0.137:6881-6999
-A PREROUTING -s 10.0.0.0/8 -p tcp -m tcp -j reflection_pre
-A POSTROUTING -s 10.0.0.0/8 -p tcp -m tcp -j reflection_post
-A POSTROUTING -o br-wan -j MASQUERADE
COMMIT

# cat /etc/sysconfig/ip6tables
*filter
:INPUT ACCEPT [0:0]
:FORWARD ACCEPT [0:0]
:OUTPUT ACCEPT [0:0]
-A INPUT -m conntrack --ctstate RELATED,ESTABLISHED -j ACCEPT
-A INPUT -m conntrack --ctstate INVALID -j DROP
-A INPUT -i lo -j ACCEPT
-A INPUT -i br-lan -j ACCEPT
-A INPUT -p ipv6-icmp -j ACCEPT
-A INPUT -s ip:6:of::HOST1/128 -j ACCEPT
-A INPUT -s ip:6:of::HOST2/128 -j ACCEPT
-A INPUT -s ip:6:of::HOST3/128 -j ACCEPT
-A INPUT -j REJECT --reject-with icmp6-adm-prohibited
-A FORWARD -m conntrack --ctstate RELATED,ESTABLISHED -j ACCEPT
-A FORWARD -m conntrack --ctstate INVALID -j DROP
-A FORWARD -i br-lan -j ACCEPT
-A FORWARD -s ip:6:of::HOST1/128 -j ACCEPT
-A FORWARD -s ip:6:of::HOST2/128 -j ACCEPT
-A FORWARD -s ip:6:of::HOST3/128 -j ACCEPT
-A FORWARD -j REJECT --reject-with icmp6-adm-prohibited
-A OUTPUT -m conntrack --ctstate RELATED,ESTABLISHED -j ACCEPT
-A OUTPUT -m conntrack --ctstate INVALID -j DROP
COMMIT
Summary
That took me around a day to build. It doesn’t have a pretty GUI, it doesn’t give me speed graphs or track usage. It’s a very basic router. Which is what I want. I could add stuff like bandwidth graphs (which might be interesting) by monitoring packets per minute. They’re “day 2” deliverables.
My “day 1” was to build a router to replace my TP-Link and that was capable of making better use of my gigabit link. And I think I’ve mostly done this. It’s actually hard to tell, because my desktop only has a 100Mbit ethernet card in it so sites like speedtest.net or fast.com just tell me the speed my desktop can handle!
For the past few years I’ve been doing a regular wget of a 100Mbyte file
from http://cachefly.cachefly.net/100mb.test but this now takes around
1 second and so the startup cost and latency become a determining factor
in the speed calculation. I’m getting speeds around 760Mbit/s, but
would a larger file give better results!
2017-05-07 14:50:02 (95.2 MB/s) - `/dev/null' saved [104857600/104857600]
2017-05-07 15:05:02 (78.6 MB/s) - `/dev/null' saved [104857600/104857600]
2017-05-07 15:20:02 (88.1 MB/s) - `/dev/null' saved [104857600/104857600]
2017-05-07 15:35:02 (93.0 MB/s) - `/dev/null' saved [104857600/104857600]
Similarly hitting other sites may give slower results because the bandwidth across the internet could be the limiting factor.
It’s funny how local and remote infrastructure can now be the limiting factor in testing speeds; previously the link to the ISP was the bottleneck.
This showed up nicely in my morning backups; every Sunday I do a level 0 dump and then put an encrypted copy into my Amazon Cloud Drive. Last week that took almost 4 hours to upload 100G. Today it took around 30 minutes, which means I was uploading at around 480Mbit/s. And there the limiting factor might have been the CPU ‘cos the process was using 380% CPU to do the encryption, on my 4-core machine!
It’s fast enough for me, anyway ;-)