
A few weeks back I completed my Arduino hack for a digital safe.
What was missing, however, was the software to drive it.
One requirement I had was to let it work with password managers. I also had the idea that maybe remote access (e.g. control the safe while away from home, to grant a guest access) might be useful.
This kinda meant it’d be easiest to do as a web site, with internet connections forwarded via the router.
In case other people also want to use this software, I decided to write it in Go; now Linux, Windows, Mac and other users could run it on their machines.
So, here it is. That zip file is 7Mb in size and contains the source, plus binaries, and the web site.
Note that at least once Windows Defender false alerted on the windows binary. If you don’t trust my compilation then read the source and compile it yourself.
Source code
The zip file contains a number of files. The source code is
in the safe.go, vend, vendor, build.sh files. You don’t
need these to run the program. If you want to recompile it yourself
then set GOPATH and run go build safe.go. The build.sh
script does this for Linux/MacOS.
Running the code
What you do need is one of the executables, for your OS (eg safe.linux.amd64)
and the static/ directory. This directory contains the web site
contents, and a simple JPEG image file, which we’ll discuss later.
Running the code may be as simple as running the binary. With no
additional configuration it will run the web server on port 5000 and
try to find the safe on a default serial port (/dev/ttyUSB0 or
COM1:).
Set up
The default values are probably not correct for you. You might see an error such as:
$ ./safe.linux.amd64
Using configuration file /home/sweh/.safe.cfg
  Serial Port = /dev/ttyUSB0
  Listen Port = 5000
  HTML static = /tmp/safe/src/safe/static
  Lock image loaded

Could not open serial port: open /dev/ttyUSB0: no such file or directory
The first line lets you know what configuration file can be used to
override the defaults.
On Windows it will look for
%HOMEDIR%%HOMEPATH% or %USERPROFILE. On Linux/MacOS it
will look in $HOME. Examples may be:
C:\Documents and Settings\sweh\.safe.cfg
C:\Users\sweh\.safe.cfg
/Users/sweh/.safe.cfg
/home/sweh/.safe.cfg
This file is a JSON format file.
{
  "ListenPort":12345,
  "SerialPort":"COM3",
  "AuthUser":"username",
  "AuthPass":"password",
  "HTMLDir":"/path/to/static"
}
Each line is optional. The smallest file might be
{
  "SerialPort":"COM3"
}
If you have multiple lines then separate them with a ,
| ListenPort | Defaults to 5000. What port to run the webserver on |
| SerialPort | Defaults to COM1 or /dev/ttyUSB0. Where the safe is |
| AuthUser | If set, require this username/password for the website |
| AuthPass | See AuthUser |
| HTMLDir | If the code can not find the static directory, you can set it here |
If you plan on making this available over the internet then I strongly recommend setting AuthUser and AuthPass.
On Linux, if you have multiple USB serial ports then it may make sense
to use the /dev/serial/by-id/... path to the serial port,
rather then /dev/ttyUSB... values to ensure that the right serial
port is picked up (just in case the order changes on next reboot).
Successful startup
Once you’ve correctly configured the software, the startup would look something like:
Using configuration file /home/sweh/.safe.cfg
  Serial Port = /dev/serial/by-id/usb-1a86_USB2.0-Ser_-if00-port0
  Listen Port = 12345
  HTML static = /tmp/safe/src/safe/static
  Lock image loaded
  Successfully connected to Safe
  OK Safe is unlocked
The “Successfully connected” means it was able to talk to the safe. The last line is the current state of the safe.
You can now access the website. In this case, I’m running on port 12345
and so http://localhost:12345 would work.
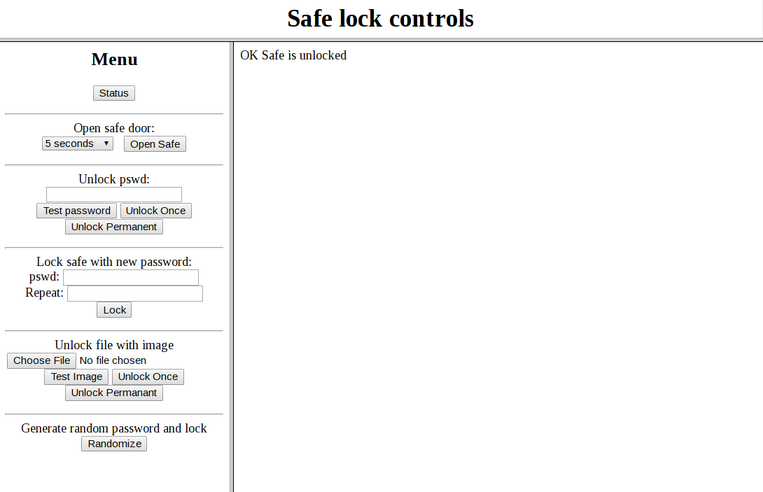
You can see that web site design isn’t my strong point. This could have been written by somebody back in 1996… and will probably still work in a browser from that time!
The controls are in the left frame, and the results on the right.
- Status
Reports the status of the safe (eg unlocked, locked, etc) Open Safe
If the safe is unlocked then it will open the solenoid for this period of time. On the right we’ll see a countdown. During this period the door can be physically unlocked and opened.OK opening safe for 5 seconds OK opening safe for 4 seconds OK opening safe for 3 seconds OK opening safe for 2 seconds OK opening safe for 1 seconds OK completed
If the safe is locked then you’ll get an error insteadTest password:
This will let you verify the password you enter is correct. It will not unlock the safe. This may be of use before a session is started, to verify the password you entered to lock the safe is correctUnlock Once:
If the password is correct then you can press the “Open Safe” button once. Once the open period is over then the safe is locked again. This is very close to the original “enter code” function on the safe keypad. It may be used, for example, to grant temporary access to the safe remotely, or just to gain everyday access without clearing the password out.Unlock Permanent:
If the password is correct then it is cleared out of the safe and the safe is returned to unlocked mode. Unlimited use of “Open Safe” is possible. This is useful when the safe no longer needs to be locked.Lock:
As expected, if the safe is currently unlocked then a new lock code can be entered, and the safe locked. Any string up to 100 characters, consisting of letters (upper and lower case) and numbers is allowed.Unlock file with image:
These options work the same way, but with the password embedded in a JPEG file; see the “Randomize” function for detailsRandomize:
This will generate a random password. It then takes thestatic/lock_image.jpgfile and embeds the password as a comment. It will then send the image to the browser; you should (all going well) be prompted to save the result.
Note: there is no encryption of the password inside the file; it’s just
stored as a comment. You could look inside and file it. But it may
be used to “hide” the password; eg inside a cat picture. No one looking
at my_funny_cat.jpg would expect to see your safe password in the comments.
It might stand out for someone using exiftool or similar, though!
If you wish, a different JPEG file can be used. The code should strip out unnecessary sections. Make sure you test carefully if you do this. Yes, your unlock picture could be an anime cat, if you really wanted it to be!
(Actually I don’t recommend using this option; it’s kinda just a joke function. You might want to remove it from the HTML so you can’t select it).
Normal password functionality
- The safe door should be open and the bolts in the unlock position
- The owner would enter a password (twice) and click on the “Lock” button
- The owner can then test the password with the “Test password” button.
- All looking good, the owner can then close and lock the safe.
Silly picture use case
- The safe door should be open and the bolts in the unlock position
- The owner will click the Randomize button, and save the image
- The owner can then test this works with the “test image” function
- All looking good, the owner can then close and lock the safe.
- The owner should rename the image file to something innocuous.
- The picture can be used to unlock the safe
Restarting
The safe can be powered down and powered up again. The PC software can be stopped and restarted. It should all automatically recover. If the serial port is disconnected while the software is running then you may need to kill and restart the software. But don’t worry; the password is stored safely inside the Arduino and the safe is kept locked :-)